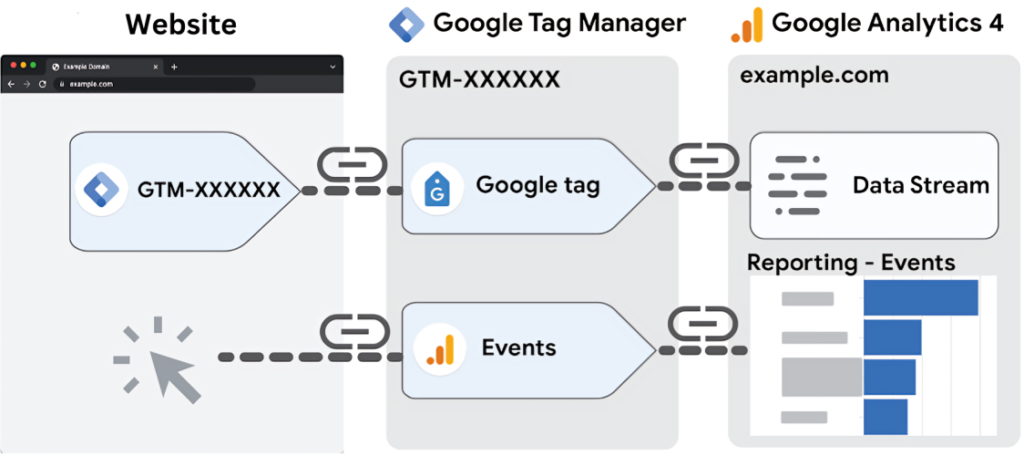
In digital marketing, tracking of data plays an important role in the success of your marketing efforts. If you’re considering tracking your website, using Google Analytics 4 (GA4) is the best choice. It provides bundles of data relevant to your business in a proper format, and it’s also free of cost, making it accessible to anyone, whether it’s a small business owner or a student who wants to learn how to track a website. In this blog, I’ll discuss how to connect a website, whether it’s a WordPress site, to GA4 using Google Tag Manager (GTM). Although there are other methods, GTM offers many more benefits than others. For those unfamiliar with Google Tag or GTM, here are some overviews:
Google Tag: Google Tag is a small piece of code that you need to add to every page of your website to collect data from it. It is provided by GA4 in the form of a measurement ID or Google Tag ID, which is a series of letters and numbers that usually starts with “G-“.
Google Tag Manager (GTM): GTM is a user-friendly tag management system provided by Google. It serves as a central place to manage and update all marketing and website tags. It allows you to add or change tags at any time using the account interface, instead of having to go back and edit the code itself.
One thing I want to add here is that, the steps I’m about to outline are based entirely on my personal experience, on connecting my website: Karan Gupta to GA4 using GTM.
Steps to Connect Your Site to GA4 using GTM:
Step 1: To connect your website to GA4, you first need a Google Analytics account. Go to analytics.google.com and set up a new account. After doing this, a new GA4 dashboard screen will appear.
Step 2: Go to the ‘Admin’ menu and select the ‘Data Stream’ option. In the data stream creation screen, choose ‘Web’, then enter your website URL. This will generate a measurement ID specifically for your website. Copy that measurement ID from there.
Step 3: Now, you need to create a new account on Google Tag Manager (GTM). Go to the Google Tag Manager website and set up a new account. Provide your account name, choose your country, and in the container section, provide your container name (use your website URL). Choose ‘Web’ and click on ‘Create’. After accepting the terms and conditions, a new GTM account will be set up.
Step 4: Now, install GTM on your website, to do this first copy the head code from the code screen and paste it into the <head> section of your website. For this, go to your site’s WordPress dashboard, click on ‘Appearance’, then ‘Theme file editor’, choose ‘header.php’, and paste the code as high in the <head> section. Now, copy the body code from the code screen and paste it immediately after the <body> tag. Click on ‘Update file’. To test if the code is successfully placed, put your website URL in the code screen and click on ‘Test’. This will show whether your codes are successfully placed or not.
Step 5: To submit GTM to your site, go to the GTM dashboard, click on ‘Submit’, then give your ‘Version name’ (e.g., GTM installed), and click on ‘Publish’. Now, your version is live, meaning GTM is successfully installed on your website.

Step 6: Now, it’s time to connect your GA4 account to GTM using the measurement ID, that you copied earlier. Go to the GTM dashboard, click on ‘Tags’, then ‘New’ to create a new tag. Give a relevant name to your tag (e.g., GA4 tag), click on ‘Tag configuration’, choose ‘Google Analytics’, and then ‘Google Tag’. Paste your measurement ID in the tag ID box.
Step 7: After doing this, choose the trigger for which your tags will be fired. Click on ‘Triggering’, select from the list of different triggers (e.g., all pages, if you want to trigger it to all pages), and click on ‘Save’. To submit the tag, click on ‘Submit’, give a ‘Version name’ (e.g., GA4 tag), and click on ‘Publish’. This will show that your version is live, meaning your GA4 is connected to your website with the help of GTM.
If you want to check that both tags, one from GTM and the other from GA4, are successfully installed on your site, install a Chrome extension named ‘Tag Assistant Companion’ on your browser. Open your website whose URL you provided earlier, then click on ‘Tag Assistant Companion’ in the extension menu. Put your website URL in the tag assistant screen, then click on ‘Connect’ and then ‘Continue’. This will show a page providing a summary of your tags and shows both tags at the top of the page. The tag starting with ‘GTM-‘ is the GTM tag, and the tag starting with ‘G-‘ is your GA4 tag. Remember, GA4 may take some time to connect to your site, maybe a day or even less. After connecting, it will show your website data in your GA4 dashboard, where you can track it.
Thank you for reading my blog. I hope, this helps you learn something new in digital marketing. If anyone has any confusion regarding connecting your site with GA4, please write it down in the comment section, and I will answer those comments. Let’s end this blog with an amazing quote: “If you can’t measure it, you can’t manage it” – Peter Drucker.
